If sourdough baking has ever made you stress-sweat during the banneton flip… this method is about to change the game.
No awkward dough transfer.
No wrestling parchment paper into a blazing hot Dutch oven.
No panic when your loaf sticks, spreads, or folds into a weird pancake situation five seconds before baking.
The Two Loaf Pan Method keeps everything simple, clean, and ridiculously beginner-friendly while still giving you that golden sourdough crust and soft bakery-style crumb.
Same dough.
Same fermentation.
Same sourdough flavor obsession.
Just a calmer bake day and a loaf that actually fits in your toaster.
What Is The Two Loaf Pan Method?
The Two Loaf Pan Method is exactly what it sounds like:
you use two loaf pans instead of a banneton and Dutch oven.
Here’s how it works:
- One loaf pan holds the dough
- The second loaf pan gets flipped upside down on top like a lid
- The dough proofs and bakes in the same pan
- The top pan traps steam during baking
That trapped steam helps the bread rise properly before the crust hardens — basically mimicking the effect of a Dutch oven without all the heavy lifting.
This method is wildly popular because it removes the most stressful parts of sourdough baking.
Why Bakers Are Obsessed With This Method
Traditional sourdough can feel like a full emotional event.
You:
- shape the dough
- proof it in a banneton
- flip it out perfectly
- score it quickly
- transfer it into screaming-hot cast iron
- pray it doesn’t collapse
Meanwhile your heart rate is at Olympic levels.
The loaf pan method eliminates most of that chaos.
Once the dough goes into the loaf pan, it stays there until fully baked.
No flipping.
No sticking.
No transfer anxiety.
No “why is my loaf sideways?” moments.
Just easy, relaxed sourdough.
Why This Method Works So Well
The loaf pan supports the dough while it rises.
That means:
- better shape retention
- easier handling
- less spreading
- cleaner oven spring
This is especially helpful for:
- high hydration dough
- soft dough
- beginner bakers
- sandwich-style sourdough loaves
Instead of fighting the dough, the pan helps hold everything together.
And honestly?
The final loaf is insanely practical.
You get:
- even slices
- toast-friendly shape
- sandwich-ready bread
- easier storage
Rustic boules are beautiful.
But loaf pan sourdough is everyday-life elite.
Why The Second Loaf Pan Matters
The second loaf pan acts like a steam lid.
When flipped upside down over the dough:
- steam gets trapped inside
- crust stays soft longer
- dough expands better in the oven
- you get stronger oven spring
This is basically the same science behind a Dutch oven.
Except:
- lighter
- cheaper
- easier
- less terrifying to handle
Once the steam phase is done, you remove the top pan so the crust can finish browning.
Simple setup.
Beautiful results.
Step-By-Step: How To Use The Two Loaf Pan Method
Step 1: Prepare Your Dough
Use your favorite sourdough recipe.
You do NOT need special dough for this method.
You can use:
- white sourdough
- whole wheat sourdough
- seeded dough
- sandwich dough
- high hydration dough
Let the dough complete bulk fermentation as normal until:
- puffy
- airy
- slightly jiggly
Step 2: Shape Into A Log
Instead of shaping a boule or batard:
shape the dough into a loaf-style log.
Try creating light surface tension without tearing the dough.
Step 3: Place Dough Into Loaf Pan
Prepare your loaf pan by either:
- lining with parchment paper
OR - greasing well with butter or oil
Place dough seam-side down inside the pan.
Step 4: Final Proof
Cover the dough and let it rise.
You can:
- proof at room temperature
OR - cold proof overnight in the fridge
Cold proofing works beautifully with this method because the dough already sits in the baking pan.
That means:
next morning = zero stress.
Step 5: Score The Dough
Before baking, score the top using:
- bread lame
- razor blade
- very sharp knife
One long slash works perfectly for loaf-style bread.
Step 6: Add The Second Loaf Pan
Flip the second loaf pan upside down over the dough pan.
This creates the steam chamber.
Make sure:
- both pans are similar sizes
- the top pan doesn’t touch the dough
Step 7: Bake Covered
Bake covered first so steam stays trapped.
Recommended Starting Temperature
425°F (218°C)
Covered Bake Time
25–30 minutes
During this stage:
- dough rises
- crust stays flexible
- oven spring develops
Step 8: Bake Uncovered
Remove the top loaf pan carefully.
Continue baking uncovered for:
15–25 more minutes
Bake until:
- deep golden brown
- crust feels firm
- internal temperature reaches 200–205°F
This stage develops:
- color
- crispness
- full crust texture
Best Loaf Pan Size
Recommended Sizes:
- 9×5 inch loaf pan
- 8.5×4.5 inch loaf pan for taller loaves
Metal pans work best because they heat evenly and create better crust.
Avoid Glass Pans
Glass heats differently and may not perform well at high sourdough temperatures.
Do You Need To Preheat The Pan?
Nope — and honestly this is one of the best parts.
Since the dough proofs directly inside the loaf pan:
you can place the entire setup straight into the oven.
No preheated Dutch oven.
No dangerous transfer process.
No burned fingers.
The bake feels way more relaxed.
Can You Cold Proof In The Loaf Pan?
Absolutely — and it’s honestly the easiest setup ever.
After shaping:
- place dough into loaf pan
- cover tightly
- refrigerate overnight
The next day:
- score
- cover with second loaf pan
- bake directly
That’s it.
No flipping dough onto parchment at 6am while questioning your life choices.
How To Prevent Sticking
Best Option: Parchment Paper
Parchment makes removal super easy and prevents sticking.
You can also:
- grease with butter
- use oil spray
- dust lightly with flour
But parchment is the safest move.
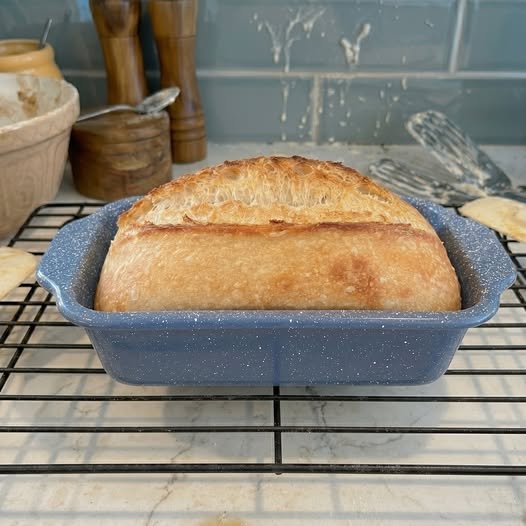
What The Final Bread Is Like
This method creates a loaf that’s:
- softer
- taller
- sandwich-friendly
- easier to slice
The crumb is usually:
- more even
- less wild/open
- super practical for everyday bread
You still get:
- sourdough flavor
- golden crust
- beautiful rise
Just in a more usable shape.
Common Mistakes & Fixes
Why Didn’t My Loaf Rise Much?
Possible reasons:
- underproofed dough
- weak starter
- dough too cold
- loaf pan too large
Always use an active bubbly starter.
Why Did The Dough Stick To The Top Pan?
Your dough likely overproofed and rose too high before baking.
Leave enough space between dough and top lid.
Why Is My Crust Too Soft?
Bake uncovered longer after removing the top pan.
That final uncovered bake develops crispness.
FAQ
Do I Need A Banneton?
Nope.
The loaf pan replaces the banneton completely.
Do I Need A Dutch Oven?
No.
The second loaf pan traps steam the same way a Dutch oven does.
Can I Use My Regular Sourdough Recipe?
Yes.
Just shape it into a loaf instead of a round boule.
Is This Method Good For Beginners?
Honestly, this might be one of the best beginner sourdough methods out there.
Way less stressful.
Way more forgiving.
Final Thoughts 

The Two Loaf Pan Method is one of those sourdough hacks that instantly makes baking feel less intimidating and way more enjoyable.
You still get:
- beautiful sourdough flavor
- oven spring
- golden crust
- soft airy crumb
But without the banneton drama and Dutch oven panic.
Sometimes the smartest sourdough upgrade isn’t buying more equipment.
Sometimes it’s just using two loaf pans and keeping your sanity intact.

Leave a Reply